Importing fonts
Link locations to import your fonts and organize your font files however you want.
Locations
Typeface lets you import fonts from any folder on your Mac, external disk or network share. These folders are added as linked locations to the sidebar. All fonts inside the folders (and subfolders) will be imported into the app.
Typeface doesn’t move or copy your font files when importing, it just links to their location. This means that you can organize your font files and directory structure however you want. For example you can keep your license files or other assets right next to the font files. Or you can sync your fonts with Dropbox such that your fonts are shared between Macs.
The subfolders of an imported location will also be visible and browsable in the app. If you want to keep your font files organized in subfolders you have direct access to this structure in the app.
Importing a new location
To import a new location you can use one of the following methods:
- Choose > > from the main menu
- Click the + button in the sidebar and choose
- Drag and drop a folder from Finder onto Typeface app
You only need to do this once. Typeface scans your imported locations for new fonts, so you don’t have import each new font manually.
You can directly drag and drop folders or files onto one of the tags in the sidebar. Typeface will import the dragged fonts if they’re not imported already and will attach the targeted tag.
Refreshing & new fonts
Your imported locations are automatically scanned on launch for new, moved and removed font files. The font files are tracked such that if you move them around Typeface will keep their tags attached. When you move a font file outside of an imported folder the font will be removed from Typeface.
New fonts will be imported after scanning. You don’t have to manually import them, just make sure the font files are located in one of your imported folders in Finder. Typeface will notice the new fonts, import them and adds them to the Last Import tag in the sidebar. Scans happen automatically in the background on launch. You can manually trigger a scan at any time by right clicking on a location in the sidebar and choosing .
Advanced location options
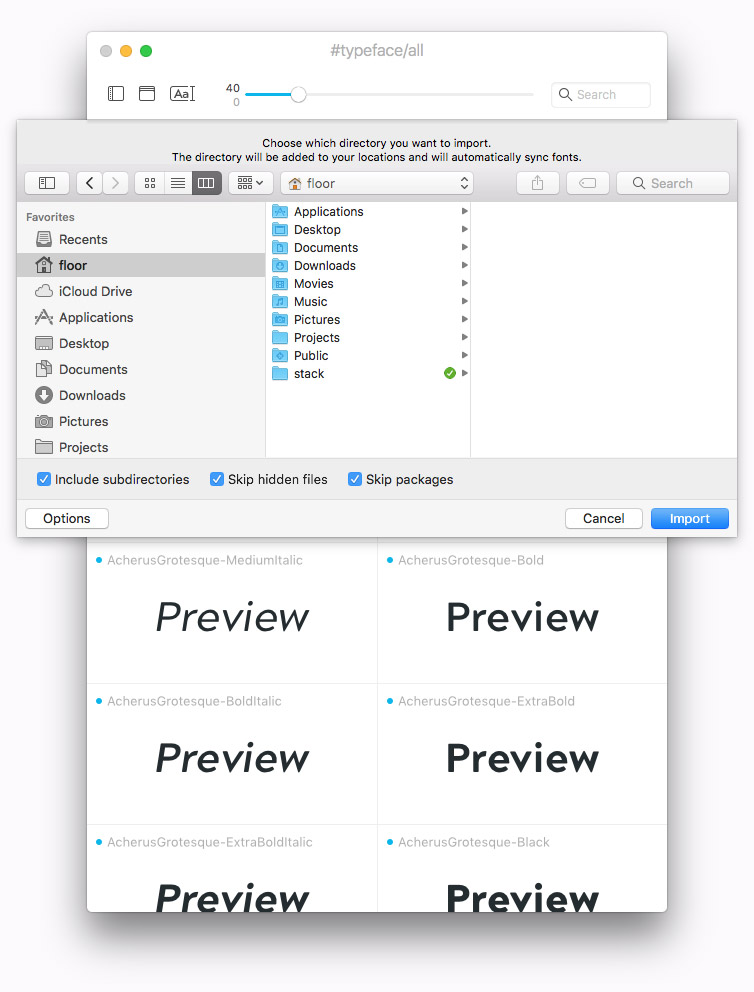
There are a couple of options you can change when you import a directory:
- Include subfolders
- Skip hidden files
- Skip packages
These settings are location specific. Change these options before import by clicking on the button in the bottom left corner. If you drag and drop a folder the default options will be used: subfolders will included, hidden files and packages will be skipped.
Importing individual fonts
In addition to importing folders Typeface allows you to import individual font files as well. Drag and drop files onto the app to import them, or right click on a supported font file in Finder and choose > . These manually imported fonts will be added to the Manual location in the sidebar. The Manual location will be hidden if there are no individually imported fonts.
Note that macOS limits the number of individual font files you can import during an app session. Typeface will warn you when you approach the limit, which is around 2000 font files. If you go over the limit Typeface is not allowed to load any font files, which may cause missing previews or other issues. Restarting your Mac will reset the limit.
There are no such restrictions when you import folders, those can contain any number of font files.
Removing fonts
Every once in a while you might want to cleanup old fonts you don’t use anymore. Right click on a font in Typeface and choose ‘Move Font to Trash’ from the context menu to move the font file to the macOS trash. The font will not be visible in Typeface anymore and its tags will be detached.
You can also manually move font files to the macOS trash in Finder. Typeface will notice that the files are gone and will remove them from your library on refresh. Previously attached tags are remembered for you, so if you accidentally removed the fonts and want to import them again later their tags are automatically restored.
Want to remove the font from Typeface but don’t want to trash the file? Right click on the font in Typeface, then hold down the Option key and select the menu item. Typeface removes the font from its library, but the font file stays where it is. Keep in mind that the font will be reimported if the font file is still located in one of your imported locations. Its tags will be restored if the font is imported again.
Removing locations
You can remove a location by right clicking on it in the sidebar and choosing . All its imported fonts will be removed from Typeface as well (but your font files will remain on your disk of course!). Any tags attached to the fonts will not be remembered. Make sure to manually create a backup of your tags if you want to import those fonts later and restore their tags.
Recommended workflow
The recommended way to manage your font files with Typeface is to create a custom folder on your Mac where you store your fonts. You can place this folder anywhere you want, for example create a ‘My Fonts’ folder in your macOS User folder and put your fonts in there. Then import that folder into Typeface by dragging the folder to the Typeface window.
Whenever you’ve downloaded new fonts move them to that custom font folder in Finder. Restart Typeface or manually refresh the imported location in the sidebar ( > ) and the new fonts will automatically show up. The new fonts are visible in the Last Import tag in the sidebar.
This approach is very flexible and you’re free to organize your font files however you like. You can create multiple font locations, for example one for free fonts and one for purchased fonts. Or create separate locations for different projects. You can create subfolders to keep your fonts neatly organized. And Typeface keeps your library up to date automatically.
Learn more about creating a custom font folder
Special font sources
System fonts
Your Mac comes with many preinstalled system fonts. Typeface automatically imports all these fonts to get you started. Any font that is globally available to apps on your Mac will be imported. That includes fonts you’ve activated or installed using Font Book or any other font manager.
If you’d rather want to see your fonts only and don’t want to import system fonts you can disable the Font Book source in > . When disabled Typeface only shows fonts from your imported locations (and your manually imported font files).
Learn more about Font Book fonts
Google Fonts
Typeface can import the full Google Fonts catalog with 2000+ fonts into your library. When imported Typeface keeps the fonts up-to-date so you’ll automatically get the latest fonts when they’re added to the catalog.
To import the Google Fonts catalog choose > > from the main menu. You can choose which fonts you’d like to download and where to store them. Depending on the options you choose the catalog will require 2-3GB of storage space.
| Prefer Static Fonts | If both variable and static versions of a font are available, download the static version. |
| Prefer Variable Fonts | If both variable and static versions of a font are available, download the variable version. |
| Download all | Download both variable and static versions of the same font when available. This may import duplicate fonts. |
| Additional Language Fonts | Download Google fonts that are created for non-latin scripts, including the full Noto font collection. This requires an additional 1GB of free disk space. |
The Google Fonts will be added to the Google location to your sidebar. Right click on the Google tag and choose the menu to adjust the configured sync options.
For more info about Google Fonts and the font licenses go to fonts.google.com.
Adobe Fonts
Import your Adobe Fonts by choosing > > from the main menu. Then confirm by clicking the Import button of the file panel.
This will add an Adobe location to your sidebar. Note that only Adobe Fonts that are synced (downloaded) to your Mac will be imported. Fonts that are not synced by the Adobe Fonts client are not visible in Typeface.
Settings
The following options are global and apply to all imported locations. You can find them in the section of the Typeface .
Skip duplicates
If the option is enabled Typeface will skip importing fonts if another font with the same PostScript name is already imported. This makes sure you always have only one copy of a font imported. For example if you have Helvetica-Light imported from macOS and have a separate Helvetica-Light font somewhere else, Typeface will not import the duplicate.
When this option is disabled (default) Typeface doesn’t skip these fonts and will import all duplicates. Remember that only one of the duplicates can be activated at the same time (otherwise you’ll get font conflicts).
Import hidden fonts
Some fonts files contain hidden fonts, starting with a leading ‘.’ (dot), e.g. “.Al Bayan PUA Plain”. These fonts are normally not visible in other apps, so you probably don’t want to see them in Typeface either. But if you want you can import them by checking the option in the panel.
Classify fonts on import
Typeface automatically tries to classify fonts on import and applies one of the #style tags. The following tags will be applied:
- #style/monospaced
- #style/ornamental
- #style/sans
- #style/script
- #style/serif
- #style/symbolic
Typeface checks the internal font meta data to see which style tag to apply. Not every font contains this information, so not every font will be classified. You can manually attach tags to the fonts that haven’t been classified automatically.
If you don’t use the #style tags and want to remove them from the app you can right click (or Control-click) on the Style tag in the sidebar and choose . Typeface will notify you that automatic classification will be disabled. You can also uncheck the option in > .
Remove missing fonts
Typeface imports fonts directly from their current location. On launch your imported folders will be scanned for new and removed fonts. When is enabled Typeface will automatically clean up your library and remove fonts that have been removed from your imported folders. If you disable this option Typeface may show empty previews in the overview for fonts that cannot be found. Usually you can leave this option enabled unless you have a very specific use case.
Note that this setting has no effect on missing imported folders. If an entire imported folder cannot be accessed, for example due to a disconnected external drive, it will stay imported such that you can easily reconnect it later. Fonts imported from the missing location will not be automatically removed from your library.